Friday, 26 July 2013

Importing Data Into A SharePoint List From An SQL Database

I often need to import data from various systems into SharePoint as part of the process of deploying a new SharePoint based solution that is intended to replace an existing (a.k.a aging) solution.

I find PowerShell is immensely useful for these types of tasks. PowerShell scripts are quick to write, incredibly flexible and very quick to test, troubleshoot, deploy, and re-deploy!

As an example, I thought I'd demonstrate how to import some data from a SQL database into a SharePoint list. The SQL query joins two lists, and returns a few hundred rows. The script iterates through the rows, adding a new SharePoint list item for each row.

It also performs some other actions as it iterates each row;

1. It adds the Category row column to the list items olCategory field (which is a Managed Metadata Field). As it does this, it checks the Termset for the Term, and if the Term doesn't already exist, it creates it.
2. It trims the rows Description field if it exceeds 255 characters.
3. It checks the rows HyperLink field starts with "http" before updating the list items URL field.
4. It uses Write-Progress to keep the "user" (me) informed about the progress of the import (see image below).

Example: Querying the SQL Server and iterating through the rows:
#Connect to the database
$conn = New-Object System.Data.SqlClient.SqlConnection("Data Source=Library; Initial Catalog=UsefulWebsites; Integrated Security=SSPI")
$conn.Open();
$query = "select lc.CategoryName,il.DisplayName,il.HyperLink,il.Description,il.Shared,lc.Shared as LCShared from incelinks il join linkscategory lc on il.CategoryId = lc.CategoryId where il.Shared = 1 and lc.shared =1 order by lc.CategoryName"
$dap = new-object System.Data.SqlClient.SqlDataAdapter($query,$conn);
$dt = new-object System.Data.DataTable;
$dap.Fill($dt);
foreach($r in $dt.Rows)
{
    Write-Host $r["DisplayName"]
}
$conn.Close();


Example: Update the list items taxonomy field (Setting the value of a taxonmy field using the CategoryName database column)
$w = Get-SPWeb http://corporate/library;
$list = $w.Lists["Useful Websites"];
$categoryField = $list.Fields["olCategory"] -as [Microsoft.SharePoint.Taxonomy.TaxonomyField];
$tsId = $categoryField.TermSetId;
$termStoreId = $categoryField.SspId;
$tsession = Get-SPTaxonomySession -Site $list.ParentWeb.Site;
$tstore =  $tsession.TermStores[$termStoreId];        
$tset = $tstore.GetTermSet($tsId);

foreach($r in $dt.Rows)
{
    $i = $list.Items.Add();
    $i["Title"] = $r["DisplayName"];
    $category = $r["CategoryName"];
    #Check if the term exists
    $terms = $tset.GetTerms($category,$false);
    $term = $null;
    if($terms.Count -eq 0)
    {
        #Create the term
        Write-Host ([String]::Format("Creating Term, {0}",$category)) -ForegroundColor DarkYellow;
        $term = $tset.CreateTerm($category, $tstore.Languages[0]);
        $tstore.CommitAll();
    }    
    else
    {
        #The term exists. Note we are using the first instance of the Term
        $term = $terms[0];
    }
    #Set the Managed Metadata field
    $categoryField.SetFieldValue($i,$term);
    $i.Update()
}


Example: The full script (for querying a SQL database and inserting the rows from the query as new items in a SharePoint list):
function Get-UsefulWebsitesFromSql
{    
    #Connect to the database
    $conn = New-Object System.Data.SqlClient.SqlConnection("Data Source=Library; Initial Catalog=UsefulWebsites; Integrated Security=SSPI")
    Write-Progress -Id 1 -ParentId 0 -Activity "Importing Data From SQL into SharePoint" -PercentComplete (1) -Status "Opening Connection to the SQL Server";
    $conn.Open();
    try
    {            
        #Execute the query
        Write-Progress -Id 1 -ParentId 0 -Activity "Importing Data From SQL into SharePoint" -PercentComplete (2) -Status "Querying SQL Server";    
        $query = "select lc.CategoryName,il.DisplayName,il.HyperLink,il.Description from links il join linkscategory lc on il.CategoryId = lc.CategoryId where il.Shared = 1 and lc.shared =1 order by lc.CategoryName"
        $dap = new-object System.Data.SqlClient.SqlDataAdapter($query,$conn);
        $dt = new-object System.Data.DataTable;
        $dap.Fill($dt);                
        $w = Get-SPWeb http://corporate/library;
        $list = $w.Lists["Useful Websites"];    
        $listTitle = $list.Title;
        $pi = $dt.Rows.Count;        
        $pci =1;                
        $categoryField = $list.Fields["olCategory"] -as [Microsoft.SharePoint.Taxonomy.TaxonomyField];
        $tsId = $categoryField.TermSetId;
        $termStoreId = $categoryField.SspId;
        $tsession = Get-SPTaxonomySession -Site $list.ParentWeb.Site;
        $tstore =  $tsession.TermStores[$termStoreId];        
        $tset = $tstore.GetTermSet($tsId);        
        $itemsAdded = 0;        
        
        Write-Progress -Id 1 -ParentId 0 -Activity "Importing Data From SQL into SharePoint" -PercentComplete (25/($pi+45)*100) -Status "Importing ($pi) items into SharePoint.";        
        foreach($r in $dt.Rows)
        {
            Write-Progress -Id 1 -ParentId 0 -Activity "Importing Data From SQL into SharePoint" -PercentComplete (($pci+25)/($pi+45)*100) -Status "Importing ($pi) items into SharePoint.";
            Write-Progress -Id 2 -ParentId 1 -Activity "Adding new items to $listTitle" -PercentComplete ($pci/$pi*100) -Status "Importing item $pci into SharePoint.";
            $pci++;
            $i = $list.Items.Add();
            try
            {
                $itemsAdded++;
                #Set the title
                $i["Title"] = $r["DisplayName"];
                #Set the Description Field. Trim the description if it's longer than 255 characters
                $description = if(($r["Description"]).ToString().Length -gt 255){($r["Description"]).ToString().SubString(0,254)}else{($r["Description"]).ToString()};
                $i["Description"] = $description;
                #Set the URL field (Hyperlink field)
                $hyperLink = $r["HyperLink"];
                if(!$hyperLink.ToLower().StartsWith("http"))
                {
                    $hyperLink = ([String]::Format("http://{0}",$hyperLink));
                }            
                Write-Host $hyperLink;
                $urlFieldValue = New-Object Microsoft.SharePoint.SPFieldUrlValue;
                $urlFieldValue.Description = ($r["DisplayName"]).Replace("&","and");
                $urlFieldValue.Url = $hyperLink;            
                $i["URL"] = $urlFieldValue;
                #Set the category field (Managed Metadata)
                $category = $r["CategoryName"];
                $terms = $tset.GetTerms($category,$false);
                $term = $null;
                if($terms.Count -eq 0)
                {
                    Write-Host ([String]::Format("Creating Term, {0}",$category)) -ForegroundColor DarkYellow;
                    $term = $tset.CreateTerm($category, $tstore.Languages[0]);
                    $tstore.CommitAll();
                }    
                else
                {
                    $term = $terms[0];
                }
                $categoryField.SetFieldValue($i,$term);
                #Save changes to the item
                $i.Update();
                Write-Host ([String]::Format("Added item: '{0}', with URL: {1}",$r["DisplayName"],$hyperLink)) -ForegroundColor Green;
            }
            catch [System.Exception]{
                Write-Host ([String]::Format(" Error adding item. Item {0} has been skipped. Error: {1}. ",$r["DisplayName"],$_)) -ForegroundColor Red -BackgroundColor White;
                continue;    
            }    
        }        
        Write-Progress -Id 1 -ParentId 0 -Activity "Importing Data From SQL into SharePoint" -PercentComplete (80) -Status "Closing SQL Connection.";        
        Write-Host ([String]::Format("Finished importing items into the list. Imported {0} items. ",$itemsAdded)) -ForegroundColor Blue -BackgroundColor White;
        Write-Progress -Id 1 -ParentId 0 -Activity "Importing Data From SQL into SharePoint" -PercentComplete (90) -Status "Finished importing ($pi) items into SharePoint.";
        $w.Dispose();
    }
    catch [System.Exception]{
        Write-Host ([String]::Format("Error: {0} ",$_)) -ForegroundColor Red -BackgroundColor White;    
        Write-Progress -Id 1 -ParentId 0 -Activity "Importing Data From SQL into SharePoint" -PercentComplete (100) -Status "An error occured.";        
    }
    finally{
        $conn.Close();    
    }            
}
Get-UsefulWebsitesFromSql;

The script looks like this when it's running:

Thursday, 25 July 2013

Using Write-Progress in a Long Running SharePoint PowerShell Script

I wrote an article on the Microsoft TechNet Wiki about using the PowerShell Write-Progress cmdlet within a long running PowerShell script. The wiki article can be seen here: An Example of Using Write-Progress in a Long Running SharePoint PowerShell Script

I thought I'd summarise the article here too.

I uploaded the script that I based my example on to the TechNet Gallery, and it can be downloaded from here: List or Delete excess ListItem Versions in a SharePoint List or Document Library

This article covers a simple scenario of using Write-Progress with a long running script that performs iterations of all the item versions in a SharePoint list, within a web and all of its sub-webs. It highlights how to nest progress bars and dynamically set the percent (%) complete. It also demonstrates using informative progress status messages.

Here are a few screen shots from the article, that demonstrate the use of the Write-Progress in a script.

Example: Enumerate all of the publishing pages in the Pages library (if found) of the sneakpreview web, and all sub-webs of sneakpreview. Store all versions of a page in excess of 5 versions in the $excessVersions variable.
$excessVersions = Get-ExcessListItemVersions -SiteUrl "http://sneakpreview  " -ListTitle "Pages" -MaxVersions 5 -Recurse


Example: Enumerate all of the publishing pages in the Pages library (if found) of the sneakpreview/informationtechnology/teamsite web.
$excessVersions = Get-ExcessListItemVersions -SiteUrl "http://sneakpreview/informationtechnology/teamsite  " -ListTitle "Pages" -MaxVersions 5


Wednesday, 10 July 2013

Well that was fun! (Bulk deleting items from a SharePoint list)

Today I made the mistake of adding approximately 32,000 new items into the wrong SharePoint list.

Oops.

So I was quickly on the hunt for some PowerShell examples of using batch operations to delete many items (have you ever tried deleting hundreds of list items using SPListItemCollection.DeleteItemById(id) or SPListItemCollection.Delete(index)? It's slow, so it's never going to work with tens of thousands of items, not to mention the problems with list threshold exceptions!).

With a little help from the internet (see blog acknowledgements below) I knocked up a quick script that uses SPQuery to query the list for the all items created since the time of my import (thankfully this list is used to record data imported on a schedule, so I could safely do this). Using the items returned, I built my batch query.

Phew... problem solved with minimal hair loss.

Firstly, thanks to the following blogs that helped:
Tim Odell - powershell-function-to-delete-all-sharepoint-list-items
Kirk Evens - iterating-large-sharepoint-lists-with-powershell

Now, back to the PowerShell...

Create the query:
$list =  (Get-Spweb http://devmy101).GetList("http://devmy101/Lists/smarEnteredTerritorialWaters")
$query = New-Object Microsoft.SharePoint.SPQuery;
$query.ViewAttributes = "Scope='Recursive'";
$query.RowLimit = 2000;
$query.Query = '<Where><Gt><FieldRef Name="Created"/><Value Type="DateTime" IncludeTimeValue="TRUE">2013-07-10T14:20:00Z</Value></Gt></Where>';

Build the command (note the query is limited to returning 2000 items at a time, and uses the ListItemCollectionPosition property to continue retrieving items in batches of 2000 until all the items have been queried. See this MSDN documentation for more info.)
$itemCount = 0;
$listId = $list.ID;
[System.Text.StringBuilder]$batchXml = New-Object "System.Text.StringBuilder";
$batchXml.Append("<?xml version=`"1.0`" encoding=`"UTF-8`"?><Batch>");
$command = [System.String]::Format( "<Method><SetList>{0}</SetList><SetVar Name=`"ID`">{1}</SetVar><SetVar Name=`"Cmd`">Delete</SetVar></Method>", $listId, "{0}" );

do
{
    $listItems = $list.GetItems($query)
    $query.ListItemCollectionPosition = $listItems.ListItemCollectionPosition
    foreach ($item in $listItems)
    {
        if($item -ne $null){$batchXml.Append([System.String]::Format($command, $item.ID.ToString())) | Out-Null;$itemCount++;}
    }
}
while ($query.ListItemCollectionPosition -ne $null)

$batchXml.Append("</Batch>");
$itemCount;

And lastly (and most importantly!), run the query
$web = Get-Spweb http://inceweb/HKMarineDB;
$web.ProcessBatchData($batchXml.ToString()) | Out-Null;

Thursday, 4 July 2013

Viewing, sorting and filtering SharePoint User Profiles using PowerShell

I wrote a post a while back that had a snippet of PowerShell code that enumerated all the SharePoint User Profiles, looking for badly formatted PictureURL properties (here: http://matthewyarlett.blogspot.co.uk/2012/09/profile-photos-not-synchronising-from.html).

Today someone asked a question in the MSDN forums about listing out all the user profiles that don't have the PictureURL property set. I supplied a slightly modified version of this script to list out all the user profiles without the PictureURL as an answer. It made me think of other uses for this, and I thought I'd share them here.

The basic code for getting all the user profiles is:

[void][reflection.assembly]::Loadwithpartialname("Microsoft.Office.Server") | out-null;
$site=new-object Microsoft.SharePoint.SPSite("https://c05470sp10:7443"); #Central Admin site
$servercontext=[Microsoft.Office.Server.ServerContext]::GetContext($site);
$site.Dispose();
$upm = new-object Microsoft.Office.Server.UserProfiles.UserProfileManager($servercontext);
$pc = $upm.GetEnumerator();


Using the collection of user profiles, we can then view, sort and filter user profiles rather easily. Here are some examples:

List all the user profiles:
$pc = $upm.GetEnumerator();
$pc | FT DisplayName 


List all the user profiles, including the account name. The account name is one the user profiles properties, in the Properties collection. We can display this information using FT (Format-Table) by specifying the field as an expression.

UserProfile object (note the Properties Collection property)


Using the Property in an expression. User profile property can be accessed directly from the UserProfile object by name, as userprofileobject["propertyname"]. We can leverage this in Format-Table by using an expression.
$pc = $upm.GetEnumerator();
$pc | FT DisplayName,@{Label="AccountName"; Expression={$_["AccountName"]}}; 


List all the user profiles, including the users department and job title.
$pc = $upm.GetEnumerator();
$pc | FT DisplayName,@{Label="Department"; Expression={$_["Department"]}},@{Label="Job Title"; Expression={$_["SPS-JobTitle"]}};


List all the user profiles including the users department and job title, sorting the values by department.

$pc = $upm.GetEnumerator();
$pc | Sort -property  @{Expression={$_["Department"]}} | FT DisplayName,@{Label="Department"; Expression={$_["Department"]}},@{Label="Job Title"; Expression={$_["SPS-JobTitle"]}};


List all the user profiles including the account name and department, sort the values by department, and filtering the user profiles to users in the IT department.

$pc = $upm.GetEnumerator();
$pc | Sort -property  @{Expression={$_["Department"]}} | ?{$_["Department"] -like "I.T."} | FT DisplayName,@{Label="Department"; Expression={$_["Department"]}},@{Label="Job Title"; Expression={$_["SPS-JobTitle"]}};


List all the user profiles that don't have a PictureURL set:

$pc = $upm.GetEnumerator();
$pc | Sort -property  @{Expression={$_["FirstName"]}} | ?{$_["PictureUrl"].Value -eq $null -or $_["PictureUrl"].Value -eq ""} | FT DisplayName; 


Wednesday, 5 June 2013

Uploading (and Resizing) Images to SharePoint

Recently I blogged about a Picture Upload webpart I wrote, that allows administrative users the ability to upload user profile pictures to SharePoint on behalf of another user. That post is here, and the solution can be downloaded from the Microsoft TechNet Gallery, here.

Anyway, I thought I'd share a bit of the code here, specifically the part of uploading, resizing and saving an image to a SharePoint document library.

Getting a file to upload to SharePoint is very easy; essentially it involves dropping an asp:FileUpload control onto your webpart page, adding a button, and lastly (optionally) an asp:Image control to render out the image that was uploaded.


And after uploading the image...


The (visual) webpart page markup for this example looks like this;

<SharePoint:CssLink runat="server" ID="mycorestyles" DefaultUrl="/_layouts/incestyles/core.css"></SharePoint:CssLink>
<div class="container">
  <div class="row">
      <div class="span8 rowpad">
          <span>Click browse to locate a file to upload, then click Upload to save it to SharePoint.</span>
      </div>
  </div>
  <div class="row">
      <div class="span8 rowpad">
          <asp:Label ID="userMessage" runat="server" Text=""></asp:Label>
      </div>
  </div>
  <div class="row">
      <div class="span8 rowpad">
          <asp:FileUpload ID="fileBrowser" runat="server" />
          <asp:Button ID="uploadFile" runat="server" Text="Upload" OnClick="UploadFileClick" />
      </div>
  </div>
  <div class="row">
      <asp:Image ID="previewImage" runat="server" Visible="false" />

  </div>
</div> 

In the above markup, I've put a CSS reference to a stylesheet I'm using for formatting the page (incidentally, that stylesheet is based on Twitters Bootstrap).

In the uploadFile button's onclick event, we can then check a file has been selected, is in the right format and not too big, before finally uploading it to a memory stream. Once we have the memory steam, we can crop and/or resize the image to our requirements. In this example, we'll resize the image if it's width or height is greater than 300px.

To do all this, a couple of other methods are called to help, one of which is the ResizeImage method, that takes a memorystream, and the maximum width and maximum height values for the image.

In the below code I've omitted elevating permissions, error handling and validation to keep the example shorter.

protected void UploadFileClick(object sender, EventArgs e)
{
  try
  {
    userMessage.Text = String.Empty;
    SPWeb web = SPContext.Current.Site.RootWeb;
    previewImage.ImageUrl = null;
    previewImage.Visible = false;
    if (!fileBrowser.HasFile)
    {
      userMessage.Text = "Please select a user to associate this image with before clicking Upload.";
      return;
    }
    //Check the file is less than 4MB
    int fileSize = fileBrowser.PostedFile.ContentLength;
    if (fileSize > 4000000)
    {
      userMessage.Text += String.Format("File Size Exceeds 4MB. Choose a smaller file.");
      return;
    }

    String imageFileExtension = Path.GetExtension(fileBrowser.FileName);
    //Check the user has selected a jpg image
    if (imageFileExtension == null || imageFileExtension.ToLower() != ".jpg")
    {
      userMessage.Text += "The file you have selected is not in the right format. Please use a jpg image.";
      return;
    }

    var imageFileData = fileBrowser.FileBytes;
    using (var imageFileStream = new MemoryStream())
    {
      imageFileStream.Write(imageFileData, 0, imageFileData.Length);
      //Before uploading the image to SharePoint, lets make sure resize the image if the width or height are greater than 300px.
      var imagePreview = ResizeImage(imageFileStream, 300, 300);
      SPList listExists = web.Lists.TryGetList("picturelibrary");
      SPUtility.ValidateFormDigest();
      if (listExists == null)
      {
        //...
        return;
      }
      var v = web.AllowUnsafeUpdates;
      try
      {
        var fileName = fileBrowser.FileName.Replace(" ", "-");
        var urlpreview = String.Format("{0}/picturelibrary/{1}", web.Url, fileName);
        web.AllowUnsafeUpdates = true;
        web.Files.Add(urlpreview, imagePreview, true);
        previewImage.ImageUrl = urlpreview;
        previewImage.Visible = true;
      }
      catch (Exception exception)
      {
        //..Do something
      }
      finally
      {
        web.AllowUnsafeUpdates = v;
      }
    }
  }
  catch (Exception exception)
  {
    //...
  }
}

public byte[] ResizeImage(Stream fileData, int maxwidth, int maxheight)
{
  using (var image = new Bitmap(fileData))
  {
    int adjustedWidth = image.Width;
    int adjustedHieght = image.Height;
    
    //Check the image is less than the maxwidth. If not, resize the image dimensions.
    if (adjustedWidth > maxwidth)
    {
      decimal ratio = Decimal.Divide(maxwidth, adjustedWidth);
      adjustedWidth = maxwidth;
      adjustedHieght = Convert.ToInt32(Decimal.Multiply(adjustedHieght, ratio));
    }
    //Now that we've adjusted the width, check the hieght is below the maximum hieght value
    if (adjustedHieght > maxheight)
    {
      decimal ratio = Decimal.Divide(maxheight, adjustedHieght);
      adjustedHieght = maxheight;
      adjustedWidth = Convert.ToInt32(Decimal.Multiply(adjustedWidth, ratio));
    }

    var resizedImage = new Bitmap(adjustedWidth, adjustedHieght);
    var g = Graphics.FromImage(resizedImage);
    g.InterpolationMode = InterpolationMode.HighQualityBicubic;
    g.SmoothingMode = SmoothingMode.HighQuality;
    g.CompositingQuality = CompositingQuality.HighQuality;
    g.PixelOffsetMode = PixelOffsetMode.HighQuality;
    g.FillRectangle(Brushes.White, 0, 0, adjustedWidth, adjustedHieght);
    g.DrawImage(image, 0, 0, adjustedWidth, adjustedHieght);
    var ms = new MemoryStream();
    const int quality = 90;
    var encoderParameters = new EncoderParameters(1);
    encoderParameters.Param[0] = new EncoderParameter(Encoder.Quality, (long)quality);
    resizedImage.Save(ms, GetImageCodeInfo("image/jpeg"), encoderParameters);
    ms.Position = 0;
    var data = new byte[ms.Length];
    ms.Read(data, 0, (int)ms.Length);
    return data;
  }
}

public static ImageCodecInfo GetImageCodeInfo(string mimeType)
{
  ImageCodecInfo[] imageEncoders = ImageCodecInfo.GetImageEncoders();
  foreach (ImageCodecInfo imageCodeInfo in imageEncoders)
  {
    if (imageCodeInfo.MimeType.Equals(mimeType, StringComparison.OrdinalIgnoreCase))
      return imageCodeInfo;
  }
  return null;
}


Friday, 10 May 2013

A quick example of implementing the ConnectionProvider / ConnectionConsumer interface with visual webparts using Visual Studio 2010

A while back I helped someone with an example of accessing the properties of a visual webpart that implemented the ConnectionConsumer attribute. It's was a quick example, so I thought I post up here too.

You can find more information about the ConnectionConsumer/ConnectionProvider classes here:

Provider Class:
http://msdn.microsoft.com/en-us/library/system.web.ui.webcontrols.webparts.connectionproviderattribute.aspx

Consumer Class:
http://msdn.microsoft.com/en-us/library/system.web.ui.webcontrols.webparts.connectionconsumerattribute.aspx

This example is using Visual Studio 2010, which creates Visual Webparts in a different manner to Visual Studio 2012.

1. Create a new Empty SharePoint project using Visual Studio 2010 (Deploy as a Farm Solution)
2. Add two new visual webparts to the project, one called Provider and the other called Consumer


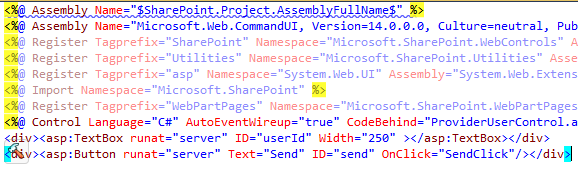
3. Add markup to the Provider webpart's user control (ProviderUserControl.ascx) for entering a user name (this will be the data passed to connected webparts)

 
<div><asp:TextBox runat="server" ID="userId" Width="250" ></asp:TextBox></div>
<div><asp:Button runat="server" Text="Send" ID="send" OnClick="SendClick"/></div> 

4. Now add code to the webpart class file, Provider.cs, to implement the provider interface.

a). First, create a new interface in the ConnectedWebparts namespace.
public interface IUser
{
    string UserId
    {
        get;
        set;
    }
}

b). Second, set the webpart's class to implement the interface, and then implement the interfaces single member, marking it with the ConnectionProvider attribute.
public class Provider : WebPart, IUser
{
    // Visual Studio might automatically update this path when you change the Visual Web Part project item.
    private const string _ascxPath = @"~/_CONTROLTEMPLATES/ConnectingWebparts/Provider/ProviderUserControl.ascx";

    protected override void CreateChildControls()
    {
        Control control = Page.LoadControl(_ascxPath);
        Controls.Add(control);
    }

    public string userId;
    public string UserId
    {
        get { return userId; }
        set { userId = value; }
    }

    [ConnectionProvider("User ID")]
    public IUser Users()
    {
        return this;
    }
}
c). The whole file should look like this:
using System;
using System.ComponentModel;
using System.Web;
using System.Web.UI;
using System.Web.UI.WebControls;
using System.Web.UI.WebControls.WebParts;
using Microsoft.SharePoint;
using Microsoft.SharePoint.WebControls;

namespace ConnectingWebparts.Provider
{
    [ToolboxItemAttribute(false)]
    public class Provider : WebPart, IUser
    {
        // Visual Studio might automatically update this path when you change the Visual Web Part project item.
        private const string _ascxPath = @"~/_CONTROLTEMPLATES/ConnectingWebparts/Provider/ProviderUserControl.ascx";

        protected override void CreateChildControls()
        {
            Control control = Page.LoadControl(_ascxPath);
            Controls.Add(control);
        }

        public string userId;
        public string UserId
        {
            get { return userId; }
            set { userId = value; }
        }

        [ConnectionProvider("User ID")]
        public IUser Users()
        {
            return this;
        }
    }

    public interface IUser
    {
        string UserId
        {
            get;
            set;
        }
    }
}

5. Next, add code to the Providers user control (ProviderUserControl.ascx.cs) that will set the IUser userid property on the webpart in the button click event.
namespace ConnectingWebparts.Provider
{
    public partial class ProviderUserControl : UserControl
    {
        protected void Page_Load(object sender, EventArgs e)
        {
        }
        protected void SendClick(object sender, EventArgs e)
        {
            if (!String.IsNullOrEmpty(userId.Text))
            {
                var parentControl = (Provider)Parent;
                parentControl.UserId = userId.Text;
            }
        }
    }
}

6. In the consumer webparts user control (ConsumerUserControl.ascx), add the markup for displaying the value passed to the webpart by the provider


<div><asp:Label runat="server" ID="displayUser"></asp:Label></div>

8. Add a property to the webparts class file (Consumer.cs) for receiving the property passed from the provider webpart. This property will be of type IUser and marked with the ConnectionConsumer attribute.

namespace ConnectingWebparts.Consumer
{
    using ConnectingWebparts.Provider;
    [ToolboxItemAttribute(false)]
    public class Consumer : WebPart
    {        
        private const string _ascxPath = @"~/_CONTROLTEMPLATES/ConnectingWebparts/Consumer/ConsumerUserControl.ascx";

        protected override void CreateChildControls()
        {
            Control control = Page.LoadControl(_ascxPath);
            Controls.Add(control);
        }

        public IUser _users;
        [ConnectionConsumer("User Id")]
        public void GetUserId(IUser users)
        {
            if (users != null)
            {
                _users = users;
            }
        }
    }
}

9. Lastly, add code to the consumer user control (ConsumerUserControl.ascx.cs) for getting the IUser property (from the parent webpart) and displaying it.
namespace ConnectingWebparts.Consumer
{
    public partial class ConsumerUserControl : UserControl
    {
        protected void Page_Load(object sender, EventArgs e)
        {
        }

        protected override void OnPreRender(EventArgs e)
        {
            base.OnPreRender(e);
            try
            {
                var parentControl = (Consumer)Parent;
                if (parentControl._users != null)
                {
                    displayUser.Text = String.Format("The selected user is: {0}", parentControl._users.UserId);
                }
            }
            catch (Exception exception)
            {
                displayUser.Text = String.Format("An error occurred: {0}", exception.Message);
            }
        }

    }
}

10. Build the project, add both webparts to a webpart page, and connect them together.

a). Connect the webparts

b). No points for good looks!

Wednesday, 8 May 2013

User Profile Picture Uploader (crop and upload on behalf of other users)

I just finished updating a webpart I wrote a while back that allows administrative users to upload, crop (enforcing a square image for proper rendering in SharePoint, Outlook, Lync, etc) and save a profile photo for a given users user profile in SharePoint. This allows for scenarios where HR or Marketing control the user profile photos uploaded for employees.

It allows you to configure the user profile picture property as "Do not allow users to edit values for this property", thus preventing employees removing photos or adding inappropriate photos, while still allowing the profile photo administrators with the ability to add/edit user profile photos.

The webpart ensures the photo uploaded is a JPEG image, the three image variations are created (144px, 96px, 32px), and makes sure the URL (PictureURL) property is correctly formatted so that user profile synchronization with Active Directory works if you are exporting profile images to Active Directory.

The webpart looks like this:


If you want to try it, you can download the WSP and User Guide from the Microsoft TechNet Gallery here: User Profile Picture Uploader