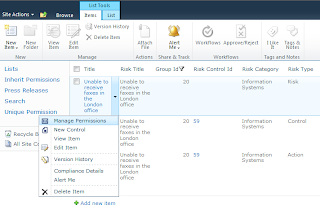
Remove the "Modify Permissions" action from the list item menu for lists that have a special content type (used in my solution). Since I need to implement a special application page for modifying list item permissions on the list my solution uses, I've added my own custom action for "Manage Permissions". I don't want to confuse users with two menu items for permissions, nor do I want them using the default "Modify Permissions" action, because it will break my solutions functionality.
While there are a number of ways to do this, most use jQuery and most wait for the ECB to be loaded before they remove the item. I don't particularly like this, because the user will typically see the "Modify Permissions" action for a brief moment before it's removed.
So I decided on a different approach that doesn't rely on jQuery. It uses JavaScript, CSS and leverages an object output by the List View Webpart, ctx, to hide the "Manage Permissions" action using CSS.
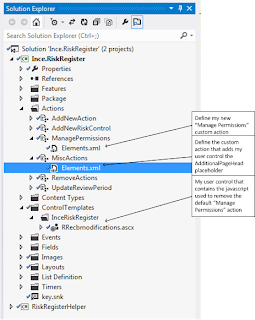
The solution elements:

Step 1: Create a user control, and define my JavaScript. The trick here is to limit the time wasted running the script on every page.
To ensure excessive processing isn't performed, the JavaScript will check to see if the ctx object has been defined (indicating the page has an instance of the List View Webpart on it).
If ctx has been defined, the script then checks the ctx.listTemplate property to see if the list instance is based on my solutions custom list template.
If the list template used is the one my solution has deployed, then it writes some CSS to the page to hide the "Manage Permissions" action on the ECB / LIM. The CSS output uses an attribute selector to hide list items with the attribute "sequence" set to 1160 (which is what "Manage Permissions" is set to; you can use Firefox and Firebug to find the sequence number for other controls).
All the user control contains is the following script:
<script type="text/javascript">
ExecuteOrDelayUntilScriptLoaded(editEcbMenusEx, 'Core.js');
function editEcbMenusEx() {
try {
if (typeof ctx == "undefined") {
return;
}
else {
if (ctx.listTemplate == 15501) {
var css = 'li[sequence="1160"]{display:none;}';
var head = document.getElementsByTagName('head')[0];
var style = document.createElement('style');
style.type = 'text/css';
if (style.styleSheet){ style.styleSheet.cssText = css; }
else { style.appendChild(document.createTextNode(css)); }
head.appendChild(style);
}
}
} catch (e) {
}
}
</script>
Step 2: Create a custom action (that gets deployed at the web level when my solution is activated) that loads my control into the AdditionalPageHead place holder of the webs master page.
<?xml version="1.0" encoding="utf-8"?>
<Elements xmlns="http://schemas.microsoft.com/sharepoint/">
  <Control Id="AdditionalPageHead" Sequence="150"
  ControlSrc="~/_CONTROLTEMPLATES/inceriskregister/RRecbmodifications.ascx">
  </Control>
</Elements>
Step 3. Deploy the solution
[Note: The Manage Permissions action that you see on the LIM is the new custom action that I've defined, which opens my custom manage permissions application page in a modal dialog)

No comments:
Post a Comment