Showing posts with label AngularJS. Show all posts

Tuesday, 26 January 2016

Building Document Set Apps on Office 365 (or SharePoint)

What’s a Document Set App?

I made the term up, so it’s not anything really, other than a name to describe a small application that stores its data in the metadata fields (properties) of a Document Set.

For those who haven’t used Document Sets in Office 365 (or SharePoint), they're similar to a folder in a document library, only a little bit smarter. Document Sets are added to document libraries, and are generally used to group together a collection of documents that share something in common. For example tender responses, sales proposals, product information, employee files, etc.

Document Sets are like other Office 365 “list items” in that they can contain metadata fields (properties).

The properties of a Document Set can optionally be “pushed” onto files within the Document Set. In this way, you can have any document that is stored within a Document Set inherit key properties from the Document Set it belongs to. That makes finding those documents easier when using search.

Document Sets share a common page for displaying these properties. The common page for displaying these properties is used whenever someone navigates to (or clicks on) a Document Set.

This is where the “Document Set App” comes in.

The common page used for displaying a Document Set is a configurable webpart page, like most other pages in Office 365. The default webparts (that display an image and the properties in a simple table view) can be removed. A new webpart can be added in its place to customise how the properties are displayed and add new rich functionality.

As an example, let’s look at an Office 365 document library used to store an employees work goals.

This example Document Set App stores information about the goal setting review as properties on the document set. The data might include things like, goals, action plans, KPI’s, self-assessment ratings, training plans etc.
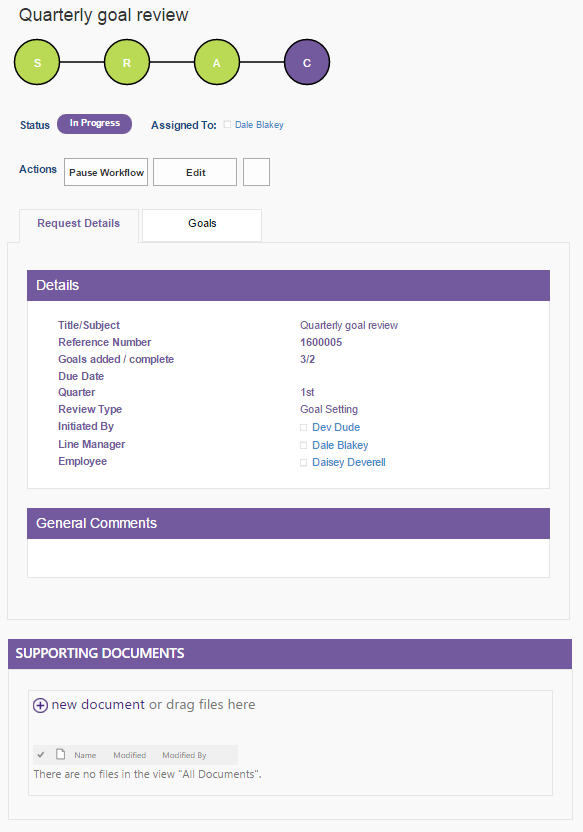


These properties can be edited on the Document Set form before, during and after the review process. The properties can contain advanced fields, repeating questions, validation, and conditional properties.


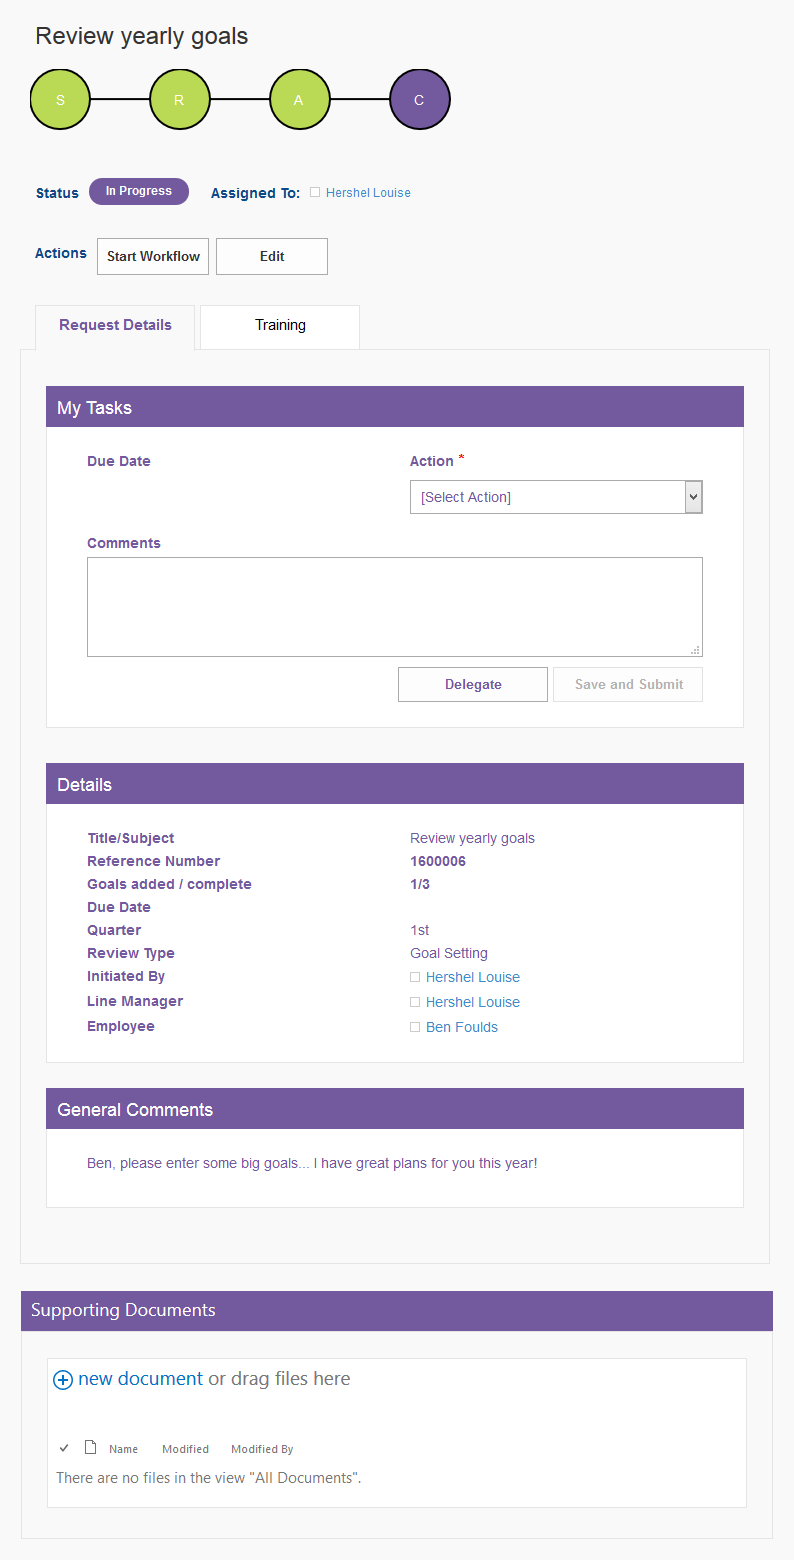
Conditional, mandatory and read-only/editable properties can be changed during different stages of the review process.

A standard workflow can be added to control the flow of the review. Workflow tasks would then be displayed inline on the form.

Indicators and graphs can be added as visual aids to show progress and status information.

Finally, the data (Document Set) can be secured so that only Personnel (HR), the employees manager and the employee themselves can see it.


Why would you use this approach to build a business app on Office 365?

There are a number of reasons why this works well.

Office 365 and the on premises version, SharePoint, offer a lot of functionality out of the box. A lot of this functionality is exposed via web services (the REST API), and can be leveraged by browser applications.

This means you can invest time into building the apps business logic, and forget about the all work that needs to be done behind the scenes to load, search, save and secure data. That’s a big saving in time, and in risk.

Time savings are easy to understand. If it would have taken three weeks to build the functionality to load, save, search and secure data, then that’s three weeks that's been saved. But what about risk?

There are always risks when building any system. Risks that requirements are misinterpreted, performance wasn’t thoroughly considered, bugs in the code, etc. Reducing the amount of code that needs to be written to provide core functionality directly reduces risk. There is less code to write, less to test, less to maintain, and ultimately, less that’s likely to go wrong.

If you don't need to spend the first few weeks of development building the "backend", you're free to focus on business logic from the beginning. That lowers the effort required to build the first version. This is particularly beneficial if you’re following a minimum viable product (MVP) approach.

The quicker a first version can be produced, the quicker feedback can be given, and the earlier issues can be caught. The business has more control through the development phase to focus on the best features, or even abandon the project if the system doesn't warrant further investment.

Here's a summary of some of the benefits I see for this approach:
  • Common look and feel – lower barriers to adoption.
  • Quick to build – CRUD operations (create, read, update, delete), search, versioning, auditing, workflow and security features are built into Office 365. 
  • SharePoint Search.
    SharePoint search results are easily be tailored to display Document Sets from specific libraries. This gives you an easy way to search for particular items. Clicking on a Document Set takes you to the common Document Set homepage – which loads the custom form.
  • List views, Export to Excel, and PowerBI.
    Power users can create views and reports to filter and analyse data. 
  • Easy to upgrade. The application is mostly made of “out-of-the-box” (fields, content types, lists, search, REST web services) components. When O365 gets an update (which happens often), it’s very unlikely to cause a problem with your application.

But what about the "when"?

There are definitely scenarios that lend themselves to building this type of app, and other scenarios where you would steer clear of this approach.

When you're planning an application you need to ask a few fundamental questions before determining its suitability to the Office 365/SharePoint platforms.

You wouldn't use this approach (or the platform) for apps that have the follow characteristics. The platform just isn't designed to support these requirements:
  • Time critical performance
  • Highly transactional
  • Complex relational data models
  • Very granular permissions
  • Large volumes of data (e.g. typically more than hundreds of thousands of records)
However, they can be a great fit for business apps with these requirements or characteristics:
  • You want a quick build time (focus on business logic, not background services)
  • You're building small "business productivity" apps, and you want to keep a common approach
  • The ROI for the app can't justify a large investment in development time
  • You have a reasonably simple data model
  • Simple requirements for permissions 
  • You want to leverage (existing) workflows (e.g. K2, Nintex)
  • You want to consume other information already in Office 365 / SharePoint (think CRM, Email, Documents, User Profile information, relevant search results, Office Graph api)
  • Where reporting and analytical data can be based on search indexes (realtime results not needed)

So, how do you build them?

This post hasn't been log enough already? Jeez! I think I'll leave that for part two!

Friday, 4 December 2015

(Updated) Using the Microsoft Client-side People Picker as an AngularJS Directive

I wrote about wrapping the Microsoft Client Side People Picker into an AngularJS Directive a few months back (eight months to be precise).

The original post is here: Using the Microsoft Client-side People Picker as an AngularJS Directive

I've made a few improvements to it recently, which I want to highlight in this post. The source code's been updated on GitHub, and can be downloaded here: AngularJS-Directive-for-SharePoint-People-Picker.

Summary of Improvements

  • Wrapped a parent DIV around the peoplepicker 
  • Works with SharePoint groups
  • Listens to model changes and updates the control appropriately
  • Re-factored code (better structure)
  • Raises events on the root scope when starting and finishing resolving users

Designed for REST

The other thing I want to draw attention to, is that this directive is built with REST in mind. It's designed to work with models received from a REST query, and it formats the model (when new users are added) in a format that can be used to submit a REST.

Before we get started, let's look at what SharePoint sends us when we query a list that has people fields, using REST.

I've used the following REST query. The query requests the people fields, and expands the Id, Name and Title properties.

https://matthewyarlett.sharepoint.com/sites/appcenter/_api/web/lists/getbytitle('peoplePickerTestList')/items(1)?$select=multiUserColumnId,singleUserColumnId,multiUserColumn/Name,singleUserColumn/Name,multiUserColumn/Title,singleUserColumn/Title,multiUserColumn/Id,singleUserColumn/Id&$expand=multiUserColumn,singleUserColumn

The following screen shot is from Fiddler, and shows the response from SharePoint (Office 365).

There are a few things worth noting here. The first is the field names that are appended with "Id".

For example, the two people fields, multiUserColumn and singleUserColumn, both have corresponding fields multiUserColumnId and singleUserColumnId. These corresponding fields don't actually exist on the list, but are returned by REST for lookup fields.

The fields appended with "Id" only every contain the Id of the lookup item. When you update a SharePoint list using REST, it's easiest to update the list using these fields, passing in just the look Id(s).

The next thing to notice is the difference in the object returned for a single user field verse a multi-user field.

The single user field contains direct properties for the user values. In the example above, these values include Name, Id, and Title.

The multi user field is slightly different. It returns an object with a single property, "results". "results" is an array of user objects. Each user object in the array has the expanded fields we specified in the REST request; Name, Id and Title.

The people picker directive is designed to work with these two different models. It will read and update a model using this format.

Using the People Picker Directive

Added a reference to the people picker directive

<!-- Load third party scripts required by the people picker -->
<script type="text/ecmascript" src="/_layouts/15/SP.UI.Controls.js"></script>
<script type="text/ecmascript" src="/_layouts/15/clienttemplates.js"></script>
<script type="text/ecmascript" src="/_layouts/15/clientforms.js"></script>
<script type="text/ecmascript" src="/_layouts/15/clientpeoplepicker.js"></script>
<script type="text/ecmascript" src="/_layouts/15/autofill.js"></script>
<script type="text/ecmascript" src="/_layouts/15/sp.RequestExecutor.js"></script>
<!-- AngularJS-->
<script type="text/ecmascript" src="../angularjs-peoplepicker/scripts/angular.min.js"></script>
<script type="text/ecmascript" src="../angularjs-peoplepicker/scripts/angular-sanitize.min.js"></script>
<script type="text/ecmascript" src="../angularjs-peoplepicker/scripts/angular-resource.min.js"></script>
<script type="text/ecmascript" src="../angularjs-peoplepicker/scripts/angular-route.min.js"></script>
<!-- All of this scripts are used to create the app. -->
<script type="text/ecmascript" src="../angularjs-peoplepicker/app.js"></script>
<!-- ****** The following script contains the people picker directive. ****** -->
<script type="text/ecmascript" src="../angularjs-peoplepicker/config/config.peoplepicker.js"></script>
<!-- ****** The following script contains the controller. ****** -->
<script type="text/ecmascript" src="../angularjs-peoplepicker/controllers/controllers.js"></script>

Add the people picker directive to the app

(function () {
    'use strict';        
    var app = angular.module('app', [
  'ngSanitize',
       'ngResource', 
     'ui.People'
    ]);
})();

Add one or more people pickers to the HTML (ensure you use a different id for each picker)

<div data-ng-disabled="false" ui-people ng-model="vm.data.su" pp-is-multiuser="{{false}}" pp-width="220px" pp-account-type="User,DL,SecGroup,SPGroup" id="peoplePickerDivAT"></div>

Conditionally, add some code to the controller to pre-populate the people picker (this would normally be a REST query to SharePoint to get some list data).

//App Controller
(function () {
 'use strict';
 var controllerId = 'appCtrlr';
 angular.module('app').controller(controllerId, ['$scope', '$timeout', appCtrlr]);

 function appCtrlr($scope, $timeout) {
  var vm = this;
  vm.webUrl = null;
  vm.data = {
   su:null,
   mu:null
  };   
  vm.getPresence = getPresence;
  var service = function () {  
   this.webAbsoluteUrl = _spPageContextInfo.webAbsoluteUrl;
   this.webRelativeUrl = _spPageContextInfo.webServerRelativeUrl;
   this.currentUserId = _spPageContextInfo.userId;
   this.webAppUrl = document.location.origin || document.location.href.substring(0, document.location.href.indexOf(document.location.pathname));  
  }
   
  init();

  function init() {
   //Normally you would get this information from a REST call to Office 365 / SharePoint
   getData(); 
   //Update the weburl property
   //This is to demo passing in a Web URL to the people picker via the pp-web-url attribute.
   $timeout(function(){
    var s = new service;
    vm.webUrl = s.webAppUrl;
    if (!$scope.$root.$$phase) {
     $scope.$apply();
    }     
    },500);
  };
  
  function getData(){
   $timeout(function(){
    vm.data.su = {
     //You'll need to add a valid claims based identity, and the SPUSER ID here
     Name:'i:0#.f|membership|someone@sometenant.onmicrosoft.com',
     Id:'19', 
     Title:'Matthew Yarlett'
     };
    //Add a user to the mulitple-user model
    vm.data.mu = {results:[]};    
    vm.data.mu.results.push({
     //You'll need to add a valid claims based identity, and the SPUSER ID here
     Name:'i:0#.f|membership|someone@sometenant.onmicrosoft.com',
     Id:'19', 
     Title:'Matthew Yarlett'});
    //Add a SharePoint group to the mulitple-user model
    vm.data.mu.results.push({
    //You'll need to add a valid claims based identity, and the SPUSER ID here
     Name:'App Center Owners',
     Id:'3', 
     Title:'App Center Owners'});
    if (!$scope.$root.$$phase) {
     $scope.$apply();
    }
   },100)
   
  }
      
  function getPresence(userId, userTitle) {
   if (userId && userTitle) {
    return '<span class="ms-noWrap"><span class="ms-spimn-presenceLink"><span class="ms-spimn-presenceWrapper ms-imnImg ms-spimn-imgSize-10x10"><img class="ms-spimn-img ms-spimn-presence-disconnected-10x10x32" src="'+service.webAbsoluteUrl+'/_layouts/15/images/spimn.png?rev=23"  alt="" /></span></span><span class="ms-noWrap ms-imnSpan"><span class="ms-spimn-presenceLink"><img class="ms-hide" src="'+service.webAbsoluteUrl+'/_layouts/15/images/blank.gif?rev=23"  alt="" /></span><a class="ms-subtleLink" onclick="GoToLinkOrDialogNewWindow(this);return false;" href="'+service.webAbsoluteUrl+'/_layouts/15/userdisp.aspx?ID=' + userId + '">' + userTitle + '</a></span></span>';
   }
   return '<span></span>';
  }
 }
})();

Possible attributes and they're values

Note: The data-pp-ready-to-load attribute has been removed from this version (the directive listens to model changes and updates the people picker accordingly).

AttributePossible valuesDefault valueRequired?
data-ng-modelFor single-user fields, an object:

model = { 'Name': object.Name, 'Title': object.Title, 'Id': object.Id }

For multi-user fields, the model needs the "results" object (which is an array) of people object.

model.results = [{ 'Name': object.Name, 'Title': object.Title, 'Id': object.Id }]

Where, name is a claims based user principal, Title is the display name of the principal, and Id is the lookup Id of the person or group
nullYes, but can be null
data-pp-is-multiusertrue | falsefalseNo
data-pp-widthAny numerical value, followed by 'px'220pxNo
data-pp-account-typeAny combination of the following values, separated by a comma;
User,DL,SecGroup,SPGroup
AllNo

Screen shot


Tuesday, 28 April 2015

Using the Client-side Taxonomy Picker Control in an AngularJS directive on Office365

In my last post I wrote about using the Microsoft client-side people picker within an AngularJS directive.

In this post I want to take a look at using the client-side taxonomy picker wrapped up as an AngularJS directive, in an app running on an Officer 365 site. In a subsequent post I'll expand on the how the code works, but this post is just intended to give a quick overview of it.

You can download the code from Github here: https://github.com/matthewyarlett/AngularJS-Client-side-Taxonomy-Picker-Directive

The Taxonomy Picker control comes from the Office 365 Developer Patterns and Practises site.

The files for this app are uploaded to a folder on the root of the site. The apps parent file, app.html, is added to a page via Content Editor Webpart.

The app looks like this:


To use the directive, follow these basic steps.

1. Add the CSS and script references to your apps html page.

The Taxonomy Picker control comes with it's own CSS, so you need to include this.

<link href="../angularjs-taxonomy/Styles/taxonomypickercontrol.css" rel="stylesheet" />

You need to add a reference to the JS file the directive is declared in, as well as all of the Microsoft Scripts that the SharePoint Taxonomy Picker requires, as well as the scripts the app requires.

<!-- Load the constant variables -->
<script type="text/ecmascript" src="../angularjs-taxonomy/config/config.constants.js"></script>
<script type="text/ecmascript" src="../angularjs-taxonomy/models/models.js"></script>
<!-- Load third party scripts -->
<!-- AngularJS, Sanitize, resource -->
<script type="text/ecmascript" src="../angularjs-taxonomy/scripts/angular.min.js"></script>
<script type="text/ecmascript" src="../angularjs-taxonomy/scripts/angular-sanitize.min.js"></script>
<script type="text/ecmascript" src="../angularjs-taxonomy/scripts/angular-resource.min.js"></script>
<script type="text/ecmascript" src="../angularjs-taxonomy/scripts/angular-route.min.js"></script>
<script type="text/ecmascript" src="../angularjs-taxonomy/scripts/ui-bootstrap.js"></script>
<script type="text/ecmascript" src="../angularjs-taxonomy/scripts/jquery-1.9.1.min.js"></script>
<script type="text/ecmascript" src="../angularjs-taxonomy/scripts/taxonomypickercontrol.js"></script>
<!-- All of this scripts are used to create the app. -->
<script type="text/ecmascript" src="../angularjs-taxonomy/app.js"></script>
<script type="text/ecmascript" src="../angularjs-taxonomy/config/config.js"></script>
<script type="text/ecmascript" src="../angularjs-taxonomy/config/config.taxonomy.js"></script>
<script type="text/ecmascript" src="../angularjs-taxonomy/common/common.js"></script>
<script type="text/ecmascript" src="../angularjs-taxonomy/common/logging.js"></script>
<script type="text/ecmascript" src="../angularjs-taxonomy/controllers/controllers.js"></script>

2. Add the directive as a dependency to your app.

(function () {
    'use strict';        
    var app = angular.module('app', [
      //inject other Angular Modules 
      'ngSanitize',
      'ngResource', 
      'ui.bootstrap',
      //add the tax picker directive
      'ui.TaxonomyPicker',
      //inject App modules
      'common'
    ]);
})();

3. Add the directive to the page (you can add multiple instances of it).

When add the directive, it has several attributes that can be set to control the behaviour of the taxonomy picker.

Most aren't mandatory, but you must add the data model (via ng-Model), and you must add the pp-ready-to-load attribute (which tells the directive the data model has updated, and is ready to be used).

Possible attributes and they're values
AttributePossible valuesDefault valueRequired?
data-ng-modelAn array, containing a list of terms, in the following format:

var termsArray = [{ 'Name': object.TermLabel, 'Id': object.TermGuid}]
nullYes (you must supply a model to the data-n-model attribute, but it contain a null value)
data-pp-ready-to-loadtrue | falsefalseYes (the taxonomy picker will not render until this value is set to true)
data-pp-is-multi-valuedtrue | falsefalseNo
data-pp-widthAny numerical value, followed by 'px'220pxNo
data-pp-termsetidThe GUID of the termset.
E.g.
a5bd4ff2-2823-4ea2-8dd6-2d02c845493b
nullNo
data-pp-is-hashtagstrue | falsefalseNo
data-pp-is-keywordstrue | falsefalseNo

An example of adding a the taxonomy picker that references a termset;


<div ui-Taxonomy ng-model="vm.terms" pp-ready-to-load="{{vm.loadTaxonomyPickers}}" pp-termsetid="a5bd4ff2-2823-4ea2-8dd6-2d02c845493b" pp-is-multi-valued="{{true}}" id="taxPickerGeography" ></div>

An example of adding a the taxonomy picker that references the hashtags termset;


<div ui-Taxonomy ng-model="vm.hashtags" pp-ready-to-load="{{vm.loadTaxonomyPickers}}" pp-is-hashtags="{{true}}" pp-is-multi-valued="{{false}}" id="taxPickerHashtags" ></div>

An example of adding a the taxonomy picker that references the keywords termset;


<div ui-Taxonomy ng-model="vm.keywords" pp-ready-to-load="{{vm.loadTaxonomyPickers}}" pp-is-keywords="{{true}}" pp-is-multi-valued="{{true}}" id="taxPickerKeywords" ></div>

4. Load the data for the model.

Before initialising the directive (via changing the value of the property used in the data-pp-ready-to-load attribute to true), ensure you up the data model used for the taxonomy picker with the current data (if any).

For example, you might perform a REST call to get the current values in a list item. You would then create the model for the taxonomy picker when data from the REST call is returned.

After updating the data in the taxonomy pickers model, you would then change the value of the property used in the data-pp-ready-to-load attribute to true.

The code below shows an example of doing this.


//App Controller
(function () {
   'use strict';
   var controllerId = 'appCtrlr';
   angular.module('app').controller(controllerId, ['$scope', appCtrlr]);

   function appCtrlr($scope) {
      var vm = this;   
      vm.data = [];    
      vm.context = null;
      vm.terms = [];
      //The data model for the taxonomy picker requires an array of values. Each value 
      //represents a term, and has the Id and Name properties. The Id property takes the 
      //terms TermGuid and the Name property correlates to the terms Label property.       
      vm.terms = [{Id:"dc146209-c1b2-697e-c0e2-9259ba19e750",Name:"Failed Inspection"}];
      vm.keywords = [];
      vm.hashtags = [];
      vm.loadTaxonomyPickers = true;
      init();
      function init() {   
         //init code.
         //e.g. get data via REST and set the data model.                   
      }
   }
})();


As a side note, when you perform a REST call to Office365 or SharePoint, for a taxonomy
field, the data comes back as an object that has the TermGuid and Label properties, as seen in the following screen capture from Fiddler:


Internally, the Microsoft Client-side Taxonomy control requires the field properties as Id and Name,
which is why we format the input object with those properties above.

However, for the sake of usability, you can also pass in the raw value from a REST call. In this case, the init function might look like this (no formatting of the data takes place):

function init() {   
   getData().then(function(data){
      vm.data = data;
      vm.loadTaxonomyPickers = true;
      if (!$scope.$root.$$phase) {
         $scope.$apply();
      }
   }) 
}

And the HTML for the control, might look like this (note the vm.data.tags.results object that is passed in as the model).

<div ui-Taxonomy ng-model="vm.data.Tags.results" pp-ready-to-load="{{vm.loadTaxonomyPickers}}" pp-termsetid="a5bd4ff2-2823-4ea2-8dd6-2d02c845493b" pp-is-multi-valued="{{true}}" id="taxPickerTags" ></div>

That's it - as far as initialising and using the control goes.

To use the value(s) of a the taxonomy picker directive while the page is open, simple reference the taxonomy picker model, like you would any other property within a controllers data model.

<span data-ng-repeat="r in vm.terms track by $index">
    {{r.Name}} <span style="color:BURLYWOOD;">(Path: {{r.PathOfTerm}})</span><span data-ng-if="!$last">,&nbsp;</span>
</span>

Persisting the value(s) of the a taxonomy picker control is just as easy. You use the data in the taxonomy pickers model to write back to the server.

In the example below, I have a model used in a REST call for updating a list item that has a taxonomy field. Data from the model (used by taxonomy picker directive) is formatted for the REST call. Each term in the array of terms is transformed into a term string, that can be passed to the server via the REST call.

sr.models.shipInfoModel = function (id) {
   this.Id = id ? id : -1;
   //"pa28754972f84ff7a6bf3e4762f23e23" is the hidden text field (automatically) created for the taxonomy field
   //This is the field that you need to use to update the taxonomy field via REST.
   //You need to format selected terms as GUID|Label pairs
   this.pa28754972f84ff7a6bf3e4762f23e23;
   this.__metadata = {
      type: 'SP.Data.SrShipRegisterListItem'
   };
}

function populateShipInfoModel(srcModel, tagsTerms) {
   var dstModel = new sr.models.shipInfoModel(srcModel.Id);   
   //Update the taxonomy field values 
   if(srcModel.Tags && srcModel.Tags.results){
      if(srcModel.Tags.results.length == 0){
         dstModel.pa28754972f84ff7a6bf3e4762f23e23 = '';
      }else{
         for(var i = 0; i < srcModel.Tags.results.length; i++)
         {
            var t = srcModel.Tags.results[i];
            dstModel.pa28754972f84ff7a6bf3e4762f23e23 = dstModel.pa28754972f84ff7a6bf3e4762f23e23 + ';' + t.Name + '|' + t.Id;   
         } 
      } 
   }
   dstModel.__metadata.etag = srcModel.__metadata.etag;
   dstModel.__metadata.id = srcModel.__metadata.id;
   dstModel.__metadata.uri = srcModel.__metadata.uri;
   return dstModel;
}

And that's it!

Tuesday, 21 April 2015

Using the Microsoft Client-side People Picker as an AngularJS Directive

[UPDATED]: I've written an updated post for this that include some feature enhancements and fixes. You can read that post here: (Updated) Using the Microsoft Client-side People Picker as an AngularJS Directive

Last year I wrote about using the Microsoft Client Side People Picker with an AngularJS app (here).

In this post, I'm building on that idea, and I'm going to demonstrate how to use the People Picker within an AngularJS Directive. Using a directive simplifies the code and makes it much more re-usable!

I'm going to break the post up into parts. This part will outline how to use the directive. The next post will cover a bit more about how the directive was created and how it works.

The code example is up on GitHub, here: AngularJS-Directive-for-SharePoint-People-Picker

Let's get into it!

1. Add the script references to your apps html page.

You need to add a reference to the JS file the directive is declared in, as well as all of the Microsoft Scripts that the SharePoint People Picker requires

<!-- Load the constant variables -->
<script type="text/ecmascript" src="../angularjs-peoplepicker/config/config.constants.js"></script>
<script type="text/ecmascript" src="../angularjs-peoplepicker/models/models.js"></script>
<!-- Load third party scripts required by the people picker -->
<script type="text/ecmascript" src="/_layouts/15/SP.UI.Controls.js"></script>
<script type="text/ecmascript" src="/_layouts/15/clienttemplates.js"></script>
<script type="text/ecmascript" src="/_layouts/15/clientforms.js"></script>
<script type="text/ecmascript" src="/_layouts/15/clientpeoplepicker.js"></script>
<script type="text/ecmascript" src="/_layouts/15/autofill.js"></script>
<script type="text/ecmascript" src="/_layouts/15/sp.RequestExecutor.js"></script>
<!-- AngularJS, Sanitize, resource -->
<script type="text/ecmascript" src="../angularjs-peoplepicker/scripts/angular.min.js"></script>
<script type="text/ecmascript" src="../angularjs-peoplepicker/scripts/angular-sanitize.min.js"></script>
<script type="text/ecmascript" src="../angularjs-peoplepicker/scripts/angular-resource.min.js"></script>
<script type="text/ecmascript" src="../angularjs-peoplepicker/scripts/angular-route.min.js"></script>
<script type="text/ecmascript" src="../angularjs-peoplepicker/scripts/ui-bootstrap.js"></script>
<script type="text/ecmascript" src="../angularjs-peoplepicker/scripts/xml2json.min.js"></script>
<!-- All of this scripts are used to create the app. -->
<script type="text/ecmascript" src="../angularjs-peoplepicker/app.js"></script>
<script type="text/ecmascript" src="../angularjs-peoplepicker/config/config.js"></script>
<!-- ****** The following script contains the people picker directive. ****** -->
<script type="text/ecmascript" src="../angularjs-peoplepicker/config/config.peoplepicker.js"></script>
<script type="text/ecmascript" src="../angularjs-peoplepicker/common/common.js"></script>
<script type="text/ecmascript" src="../angularjs-peoplepicker/common/logging.js"></script>
<script type="text/ecmascript" src="../angularjs-peoplepicker/services/dataservices.js"></script>
<script type="text/ecmascript" src="../angularjs-peoplepicker/controllers/controllers.js"></script>

2. Add the directive as a dependency to your app.

(function () {
    'use strict';        
    var app = angular.module('app', [
    //inject other Angular Modules
    'ngSanitize',
    'ngResource', 
    'ui.bootstrap',
    //inject the People Picker directive
    'ui.People',
    //inject App modules
    'common'
    ]);
})();

3. Add the directive to the page (you can add multiple instances of it).

When add the directive, it has several attributes that can be set to control the behaviour of the people picker.

Most aren't mandatory, but you must add the data model (via ng-Model), and you must add the pp-ready-to-load attribute (which tells the directive the data model has updated, and is ready to be used).

Possible attributes and they're values
AttributePossible valuesDefault valueRequired?
data-ng-modelAn array, containing a list of users, in the following format:

var userArray = [{ 'Name': object.Name, 'Title': object.Title, 'Id': object.Id }]

Where, name is a claims based user principal, and Title is the display name of the prinicpal
nullYes (you must supply a model to the data-n-model attribute, but it contain a null value)
data-pp-ready-to-loadtrue | falsefalseYes (the people picker will not render until this value is set to true)
data-pp-is-multiusertrue | falsefalseNo
data-pp-widthAny numerical value, followed by 'px'220pxNo
data-pp-account-typeAny compination of the following values, seperated by a comma;
User,DL,SecGroup,SPGroup
User,DL,SecGroup,SPGroupNo

An example of adding a single user picker;

<div ui-People ng-model="vm.data.su" pp-ready-to-load="{{vm.loadPeoplePickers}}" pp-is-multiuser="{{false}}" pp-width="220px" pp-account-type="User" id="peoplePickerDivAT"></div>

An example of adding a multiple user picker:

<div ui-People ng-model="vm.data.mu" pp-ready-to-load="{{vm.loadPeoplePickers}}" pp-is-multiuser="{{true}}" id="peoplePickerDivAP"></div>

4. Load the data for the model.

Before initialising the directive (via changing the value of the property used in the data-pp-ready-to-load attribute to true), ensure you up the data model used for the people picker with the current data (if any).

For example, you might perform a REST call to get the current values in a list item. You would then create the model for the user picker when data from the REST call is returned.

After updating the data in the people pickers model, you would then change the value of the property used in the data-pp-ready-to-load attribute to true.

The code below shows an example of doing this.

function init() {   
   //Pre-populate the single user field
   //Normally you would get this information from a REST call to Office 365 / SharePoint
   vm.data.su = populatePickerModel({
      Name:'i:0#.f|membership|someone@sometenant.onmicrosoft.com',
      Id:'19', 
      Title:'Matthew Yarlett'});
   vm.loadPeoplePickers = true;
   if (!$scope.$root.$$phase) {
      $scope.$apply();
   }
};

That's it - as far as initialising and using the control goes.

To use the value(s) of a the people picker directive while the page is open, simple reference the people picker model.

E.g.

<p>
    <span data-ng-repeat="r in vm.data.su track by $index">
        <span data-ng-bind-html="vm.getPresence(r.Name, r.Title)"></span>&nbsp;
    </span>
</p>

The example above uses a function on the controller to return the users name including the presence icon, It's just some standard html that I've exported (and slightly tweaked) from a SharePoint user field. Note that it uses a "constweb" variable to get the weburl - you would need to set this!

function getPresence(userId, userTitle) {
   if (userId && userTitle) {
      return '<span class="ms-noWrap"><span class="ms-spimn-presenceLink"><span class="ms-spimn-presenceWrapper ms-imnImg ms-spimn-imgSize-10x10"><img class="ms-spimn-img ms-spimn-presence-disconnected-10x10x32" src="'+constWeb+'/_layouts/15/images/spimn.png?rev=23"  alt="" /></span></span><span class="ms-noWrap ms-imnSpan"><span class="ms-spimn-presenceLink"><img class="ms-hide" src="'+constWeb+'/_layouts/15/images/blank.gif?rev=23"  alt="" /></span><a class="ms-subtleLink" onclick="GoToLinkOrDialogNewWindow(this);return false;" href="'+constWeb+'/_layouts/15/userdisp.aspx?ID=' + userId + '">' + userTitle + '</a></span></span>';
   }
      return '<span></span>';
}

Persisting the value(s) of the a people picker control is just as easy. You use the data in the people pickers model to write back to the server.

In the example below, I have a model used in a REST call for updating a list item that has a people picker field. Data from the people picker directive's model is formatted for the REST call. The ID (SPUser.Id) of each resolved principal (user or group) is added to an array of ID's, which is passed to the server via a REST call.

var sr = sr || {};
sr.models = sr.models || {};

sr.models.listItemModel = function (id) {
   this.Id = id ? id : -1; 
   this.srSingleUserField = null;
   this.srMultipleUserField = {
      results: []
   };   
   this.__metadata = {
      //The type is unique to your list. You can find out the type byte
      //looking at the list using a REST via the browser
      //E.g. http://my.site.com/_api/web/lists/getlistbytitle("YourListName")
      type: 'SP.Data.SrListItem'
   };
}

function populatelistItemModel(srcModel, tagsTerms) {
   var dstModel = new sr.models.listItemModel(srcModel.Id);            
 //Single user field
 if(srcModel.su){
  if(srcModel.su.length == 0){
   dstModel.srSingleUserField = null;
  }
  else{
   var user = srcModel.su[0];
   dstModel.srSingleUserField = user.Id
  }
 } 
   //Mutli user field
   if (srcModel.mu) {
      if(srcModel.mu.length == 0){
         dstModel.srMultipleUserField.results = [];
      }
      else{
         for(var i = 0; i < srcModel.mu.length; i++){
            var user = srcModel.mu[i];
            dstModel.srMultipleUserField.results.push(user.Id);
         }
      }
   }
   dstModel.__metadata.etag = srcModel.__metadata.etag;
   dstModel.__metadata.id = srcModel.__metadata.id;
   dstModel.__metadata.uri = srcModel.__metadata.uri;
   return dstModel;
}

I also added some CSS to override a few of the People Pickers classes, that fixes a few style issues. It's optional, but I've added it below for completeness.

The CSS classes are prepended with div#strk (the parent DIV of my sample), to ensure these classes only affect the app.


/* People Picker Modifications */
div#strk .sp-peoplepicker-autoFillContainer{
 z-index: 20;
 background-color:#fff;
}
div#strk .sp-peoplepicker-topLevel{
 background-color:#fff;
}
div#strk .sp-peoplepicker-topLevel{
 min-height:34px;
}

When it's all said and done, it looks like this;


Tuesday, 23 December 2014

Using SharePoints SpellCheck Webservice with TinyMCE and AngularJS

In this post I want to demonstrate how to use SharePoint's SpellCheck webservice with the TinyMCE Richtext editor.

There are many reasons why you might choose to use the TinyMCE richtext editor over the Office365/SharePoint richtext editor. One of those reasons is if you're building a clientside app that needs a richtext editor, and you want the richtext controls to be inside the app, and not on the ribbon.

TinyMCE is a great richtext editor with good cross browser support. Among the functionality it has, it provides a way to integrate with a spell checking service.

In the example below I'm going to demonstrate how to integrate the SharePoint spellcheck.asmx webservice with the a TinyMCE richtext editor, in an AngularJS app, hosted in an Office365 or SharePoint site.

The files for this example can be downloaded from the MSDN TechNet Gallery, here: Technet Gallery. I suggest you download the files and look through the code to fully understand the example. To use the example, follow the instructions in the readme.txt file included in the zip file.

What I want to focus on here is how to call the webservice, and then how to interpret the results.

First, I'll start with a screenshot of what this looks like when it's running (the screen shots are from SharePoint 2013, but this works exactly the same with Office365):


The code to get this running looks like this  (remember, the full source can be downloaded here: TechNet Gallery):

First, the app's html file. It's pretty simple, containing a few script references and a textarea.

<!-- There's not much to the HTML file. A div that references my AngularJS controller, and then a textarea with the data-ui-tinymce attribute. -->
<div id="ng-app" data-ng-app="app" data-ng-cloak >
    <div data-ng-controller="spellCheckExampleCtrl as vm" data-ng-cloak>
        <textarea data-ui-tinymce id="eBriefTiming" data-ng-model="vm.richTextContent"></textarea>
    </div>
</div>
<!-- Load the scripts -->
<!-- XML2JSON is used to transfor the XML based response from the Spellcheck webservice to JSON -->
<script type="text/ecmascript" src="../tinymce/xml2json.js"></script>
<!-- AngularJS, Sanitize, resource and tinymce -->
<script type="text/ecmascript" src="../tinymce/angular.js"></script>
<script type="text/ecmascript" src="../tinymce/angular-sanitize.js"></script>
<script type="text/ecmascript" src="../tinymce/angular-resource.js"></script>
<script type="text/ecmascript" src="../tinymce/tinymce/tinymce.min.js"></script>
<!-- My scripts. All of this scripts are used to create the app. -->
<script type="text/ecmascript" src="../tinymce/config.tinymce.js"></script>
<script type="text/ecmascript" src="../tinymce/app.js"></script>
<script type="text/ecmascript" src="../tinymce/controllers.js"></script>
<script type="text/ecmascript" src="../tinymce/services.js"></script>

The app and controller code. Again, this is pretty simple; it's not really doing much in this simple app.

(function () {
    'use strict';
    var app = angular.module('app', [
    'ngSanitize',
    'ngResource',
    'ui.tinymce'
    ]);
    app.run();
})();

//App Controller
(function () {
    'use strict';
    //define the controller
    var controllerId = 'spellCheckExampleCtrl';
    angular.module('app').controller(controllerId, ['$scope', '$q', spellCheckExampleCtrl]);
    function spellCheckExampleCtrl($scope, $q) {
        var vm = this;
        vm.richTextContent = null;     
        init();
        function init() {           
        };
    }
})();

This next bit of code initialises the TinyMCE directive with AngularJS. The main point of interest in this code snippet is the spellchecker_callback function. Example the function, specifically how the results from the spelling webservice are interpreted.

(function () {
//pass in the remoteServices factory. This factory contains the method for querying the SharePoint Spellcheck webservice
angular.module('ui.tinymce', [])
.value('uiTinymceConfig', {})
.directive('uiTinymce', ['uiTinymceConfig', 'remoteServices', function (uiTinymceConfig, remoteServices) {
uiTinymceConfig = uiTinymceConfig || {};
var generatedIds = 0;
return {
require: 'ngModel',
priority: 10,
link: function (scope, elm, attrs, ngModel) {
var expression, options, tinyInstance;
var updateView = function () {
ngModel.$setViewValue(elm.val());
if (!scope.$root.$$phase) {
scope.$apply();
}
};
if (attrs.uiTinymce) {
expression = scope.$eval(attrs.uiTinymce);
} else {
expression = {};
}
if (expression.setup) {
var configSetup = expression.setup;
delete expression.setup;
}
// generate an ID if not present
if (!attrs.id) {
attrs.$set('id', 'uiTinymce' + generatedIds++);
}
options = {
// Update model when calling setContent (such as from the source editor popup)
setup: function (ed) {
ed.on('init', function (args) {
ngModel.$render();
ngModel.$setPristine();
});
// Update model on button click
ed.on('ExecCommand', function (e) {
ed.save();
updateView();
});
// Update model on keypress
ed.on('KeyUp', function (e) {
ed.save();
updateView();
});
// Update model on change, i.e. copy/pasted text, plugins altering content
ed.on('SetContent', function (e) {
if (!e.initial && ngModel.$viewValue !== e.content) {
ed.save();
updateView();
}
});
// Update model when an object has been resized (table, image)
ed.on('ObjectResized', function (e) {
ed.save();
updateView();
});
if (configSetup) {
configSetup(ed);
}
},
mode: 'exact',
elements: attrs.id,
inline_styles: true,
plugins: [
"advlist autolink lists link charmap hr pagebreak",
"searchreplace wordcount visualblocks visualchars code fullscreen",
"insertdatetime nonbreaking table contextmenu",
"paste textcolor spellchecker"
],
//override the default spellchecker (which, OOTB, doesn't work with SharePoint). Instead we'll use SharePoints spellcheck webservice.
//This method is documented here: http://www.tinymce.com/wiki.php/Configuration:spellchecker_callback
spellchecker_callback: function (method, text, success, failure) {
if (method == "spellcheck") {
//Call the checkSpelling method (this is a method we've defined in another file, documented in the next script block).
//This method will query the SharePoint spellcheck webservice. The query contains the full text from the
//TinyMCE richtext editor.
//When the response comes back, we need to create an array of spelling errors and suggestions
remoteServices.checkSpelling(text).then(function (data) {
var wordCollection = data;
var suggestions = [];
//***
//Check for spelling errors
//***
//Get the array of flagged words that are errors
var spellingErrors = null;
if (data.spellingErrors.SpellingErrors && data.spellingErrors.SpellingErrors.flaggedWords !== 'undefined') {
    spellingErrors = data.spellingErrors.SpellingErrors.flaggedWords.FlaggedWord;
}
//Check if an array of items was returned
if (spellingErrors instanceof Array == true) {
    for (var wi = 0; wi < spellingErrors.length; wi++) {
        var w = spellingErrors[wi];
        suggestions[w.word] = [];
    }
}
//Check if a single item was returned
else if (spellingErrors && spellingErrors.word) {
    suggestions[spellingErrors.word] = [];
}
//***
//Check for spelling suggestions
//***
//Get the array of flagged words with suggestions
var spellingSuggestions = null;
if (data.spellingSuggestions.SpellingSuggestions) {
    spellingSuggestions = data.spellingSuggestions.SpellingSuggestions;
};
//Check if an array of items was returned
if (spellingSuggestions instanceof Array == true) {
    for (var wi = 0; wi < spellingSuggestions.length; wi++) {
        var w = spellingSuggestions[wi];
        //Check if there is a single spelling suggestion, or an array of suggestions.
        //Then add it to suggestions array for the current word
        suggestions[w.word] = (w.sug.string instanceof Array == true) ? w.sug.string : [w.sug.string];
    }
}
//Check if a single item was returned
else if (spellingSuggestions && spellingSuggestions.word) {
    //Check if there is a single spelling suggestion, or an array of suggestions.
    //Then add it to suggestions array for the current word
    suggestions[spellingSuggestions.word] = (spellingSuggestions.sug.string instanceof Array == true) ? spellingSuggestions.sug.string : [spellingSuggestions.sug.string];
}
//Return the list of suggestions to the success handler.
success(suggestions);
})["catch"](function (error) {
//in my testing, failure doesn't seem to work. So I'm sending back Success with a null value.
success(null);
});
}
},
toolbar: "styleselect | bold italic | bullist numlist outdent indent | link | spellchecker",
fontsize_formats: "9pt 10pt 11pt 12pt 14pt 16pt 18pt 20pt 22pt 24pt",
menubar: true,
statusbar: false,
height: 300,
width: 620
};
angular.extend(options, uiTinymceConfig, expression);
setTimeout(function () {
tinymce.init(options);
});
ngModel.$render = function () {
if (!tinyInstance) {
tinyInstance = tinymce.get(attrs.id);
}
if (tinyInstance) {
tinyInstance.setContent(ngModel.$viewValue || '');
ngModel.$setPristine();
}
};
scope.$on('$destroy', function () {
if (!tinyInstance) { tinyInstance = tinymce.get(attrs.id); }
if (tinyInstance) {
tinyInstance.remove();
tinyInstance = null;
}
});
}
};
}]);
})();

Finally, the code for the remoteServices factory. This code is responsible for making the call to SharePoint's Spellchecker webservice.

(function () {
'use strict';
var serviceId = 'remoteServices';
angular.module('app').factory(serviceId, ['$resource','$q', remoteServices]);
function remoteServices($resource, $q) {
    var service = this;       
    init();
    //service signature
    return {           
        checkSpelling: checkSpelling
    };
    function init() {           
    }
    //This function returns a resource used to query
    //the spellcheck webservice. It contains the HTTP method,
    //headers and will transform the response from XML to JSON
    function getSpellCheckerResource() {
        return $resource('/_vti_bin/spellcheck.asmx',
        {}, {
            post: {
                method: 'POST',
                params: {
                    'op': 'SpellCheck'
                },
                headers: {
                    'Content-Type': 'text/xml; charset=UTF-8'
                },
                transformResponse: function (data) {
                    // convert the response data to JSON
                    // before returning it
                    var x2js = new X2JS();
                    var json = x2js.xml_str2json(data);
                    return json;
                }
            }
        });
    }
             
    //This is the public function the TinyMCE editor will
    //call when the check spelling button is clicked.
    //The functions takes a block of text (or words) as input
    //and returns the spellcheck results
    function checkSpelling(words) {
    //Convert an array of words into a single string
    var wordstring = "";
    for(var i = 0; i < words.length; i++)
    {
        wordstring += (words[i] + ' ');
    }          
    //build the SOAP request
    var soapData = '<?xml version="1.0" encoding="utf-8"?><soap:Envelope xmlns:xsi="http://www.w3.org/2001/XMLSchema-instance" xmlns:xsd="http://www.w3.org/2001/XMLSchema" xmlns:soap="http://schemas.xmlsoap.org/soap/envelope/"><soap:Body><SpellCheck xmlns="http://schemas.microsoft.com/sharepoint/publishing/spelling/"><chunksToSpell><string>' + wordstring + '</string></chunksToSpell><declaredLanguage>3081</declaredLanguage><useLad>false</useLad></SpellCheck></soap:Body></soap:Envelope>'
    //Get the resource (defined in a function above) used to query the webservice
    var resource = getSpellCheckerResource();
    var deferred = $q.defer();
    //Post the data (the string of words) to the webservice 
    //and wait for a response!
    resource.post(soapData, function (data) {
        //successful callback          
        deferred.resolve(data.Envelope.Body.SpellCheckResponse.SpellCheckResult);
    }, function (error) {
        //error callback
        var message = 'Failed to queried the SharePoint SpellCheck webservice. Error: ' + error.message;
        deferred.reject(message);
    });
        return deferred.promise;
    }
}
})();

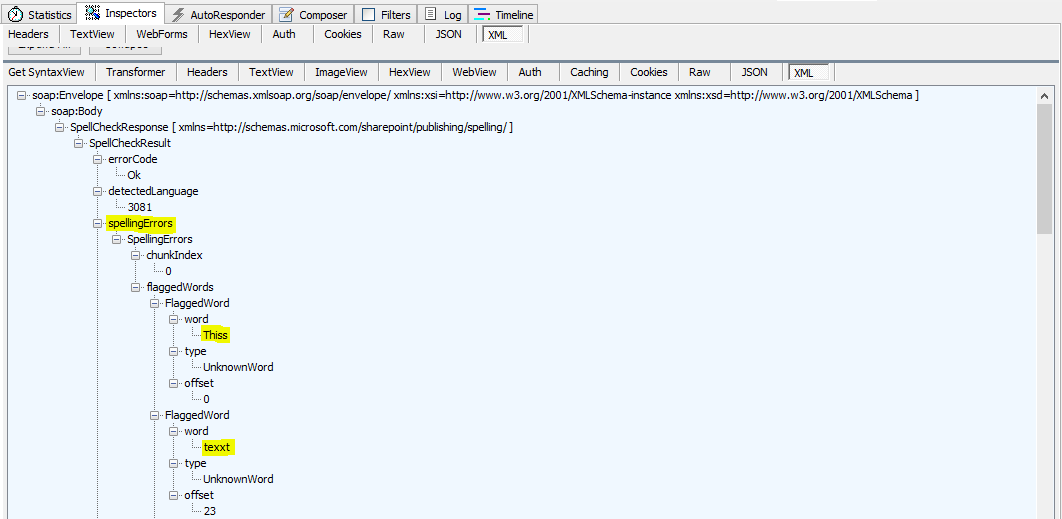
The screenshots below (taken from Fiddler and Chrome) show the request being sent and the data that is received back.

Request.


Response (showing the errors).


Response (showing the suggestions).


You can inspect the array of spelling suggestions and errors received back from the webservice by putting a break in the code.


Hpapy Spallnig!

References: